Version Control
Introduction
Take a moment to reflect on everything you learned if you got this far! Congratulations, it really is impressive!
Now it’s time to learn how to show off your skill to the rest of the world, keep track of important analyses, and collaborate with other R coders. In this chapter you’ll create and maintain your own code repository on a (free) website called GitHub. You’ll learn how to use GitHub with R Studio to create, modify, and maintain your code online.
As your coding skills continue to develop, repositories will become crucial for sharing and collaborating on projects. For example, the repository for your a thesis or peer-reviewed manuscript may include many different data sets, R programs, and R markdown documents. As your projects get more complicated with multiple collaborators, it can help to have Version Control to decide which changes to keep and which to exclude.
Repository
A repository, sometimes shortened to just repo, is just a hard drive somewhere that stores your code. GitHub (https://GitHub.com) is a website that makes it easy to create and manage your repositories, and decide which ones to make available to the public. The word GitHub comes from a programming tool called git, which provides a protocol for communicating between your computer and your online repository.
Git and GitHub are useful for sharing code and collaborating on projects. But you can use your GitHub site as an online CV or Resume to raise your profile and get noticed by potential employers. For example, here is a link to my GitHub site: https://github.com/colauttilab
And here is an example of a public repository for a published paper on SARS-CoV-2 genome evolution during the early stages of the COVID-19 pandemic: https://github.com/ColauttiLab/SARS-CoV_Phylogenomics
If you go to the SARS-Cov-2 repository, you’ll see a list of folders and files that make up the GitHub repository. It can help to think of your repository as an online image of your Project Folder in R. Later, we’ll see how to use special protocols to sync this folder to your computer, and decide which changes to keep or reject.
README.md
Take note of one specific file, called Readme.md. All repositories should include a well-documented readme file. The readme file contains important information about the other files in the repository.
If you scroll down, you’ll see a description of the analysis pipeline, including a flowchart diagram and some additional notes. This is all generated from the Readme.md file. The md stands for ‘markdown’ and it is very similar to the R markdown (.Rmd) format discussed in the first part of this book. That’s because R markdown is built on the markdown language. The main difference is that a regular markdown file won’t render R code. However, you can still use different text formatting (including a special font for code), and add images and hyperlinks using markdown. See the R Markdown chapter for more detail.
GitHub Account
Now that you understand the basics, Make a (free) account at https://GitHub.com
You will need to choose a unique user name. Take some time to add a headshot or picture that represents you, and add some basic details to your profile. Just taking a few minutes to do this will help your account stand out from the many other generic accounts on GitHub. Remember that this is your public-facing profile that might be seen by potential collaborators, employers, or recruiters, so keep it professional.
Install Git
The git program will help us communicate with GitHub to update our files, or search for updates submitted by other users. It should be installed when you installed R Studio. If not, you can downoad it at http://git-scm.com/downloads
If you need to install or reinstall git, be sure to quit and restart R and R Studio after you have installed it. Once git is installed, open R Studio and choose Global Options from the Tools menu. Then, click on Git/SVN on the left and the Enable version control interface for RStudio projects at the top.
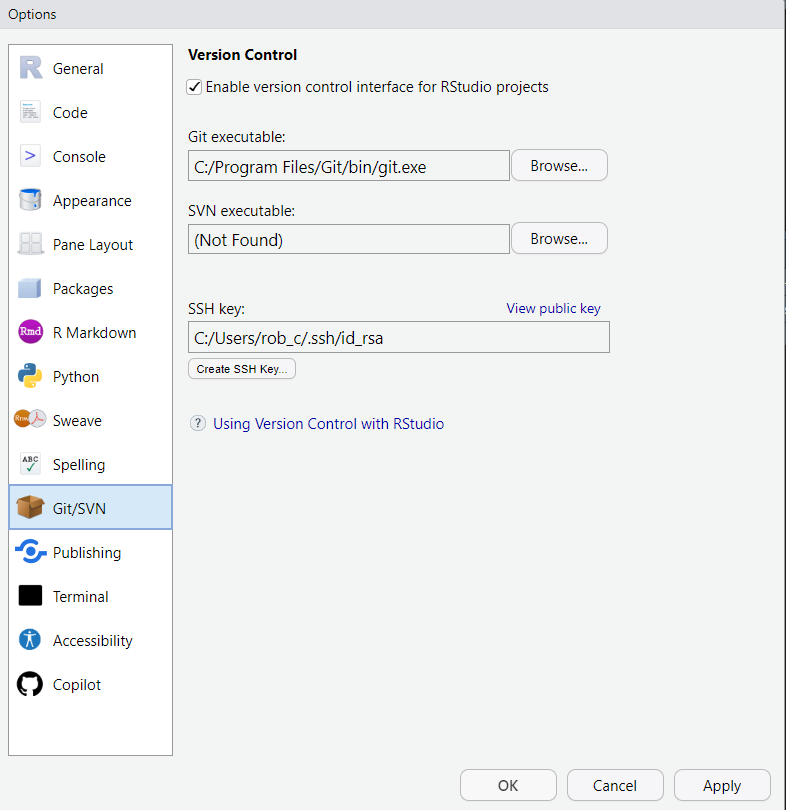
You may also need to specify the location of your Git executable by clicking the Browse button. Here, you should link to the git (OSX) or git.exe (Windows) that you installed. If you have trouble locating the follow, try this
- (Windows): Search for ‘Command Prompt’ from your Start Menu and type:
where git - (Mac OS & Linux): Open the ‘Terminal’ window and type:
which git
That’s it! Now you should be ready to set up your repository.
Your First Repo
Step 1: GitHub Repo
Open a web browser and navigate to your GitHub website. It should be something like github.com/username where username is the GitHub user name you chose when you set up your account.
Click on Repositories near the top of your github page, then click the green button that says New and give your repository a name that you can easily remember.
Add a short description, and select the options to add a README and .gitignore file.
You may select a license if you would like to protect your code. You should do this when writing original code, but for now we are just creating a repository to explore how GitHub works.
Finally, click Create repository and copy the full web address for your repository. It should be a web link that starts with GitHub.com and ends with .git. This is the link that R Studio will use to sync your GitHub repository with your local computer.
Step 2: R Project
Create a new project in R Studio from the menu File-->New Project but be sure to select Version Control and then click Git – note that it is written sideways with a red ‘i’ and green ‘t’.
Paste the GitHub link into the Repository URL: field. This tells R Studio where to find the repository on GitHub.
Note: If your repository URL didn’t copy properly, you can just add
.gitto the end of the web link for your repository. For example, if your repository is https://GitHub.com/username/FirstRepo then the link in R Studio should be https://GitHub.com/username/FirstRepo.git
Use the Browse button to choose where you would like to save the project file on your local computer.
You can leave Project Directory Name alone so that the project folder name on your computer matches the repository name on GitHub. You can change it, but this may cause you confusion later.
Git tab
R Studio has a specific Git tab for managing repositories with git. By default, it is usually one of the tabs in the top-right window of R Studio, in the same window as Environment and History. However, it may have moved if you changed your R Studio settings.

The Git tab will probably be empty when you first set up your project following the steps in the previous section.
The first thing you should do, right away, is click on the blue down arrow labelled Pull . You may be prompted to enter or confirm your password, and then R Studio will download or ‘pull’ the latest versions of the files in your repository from GitHub to your computer. It’s good practice to do this first, before you start editing, to make sure you are working with the latest file versions.
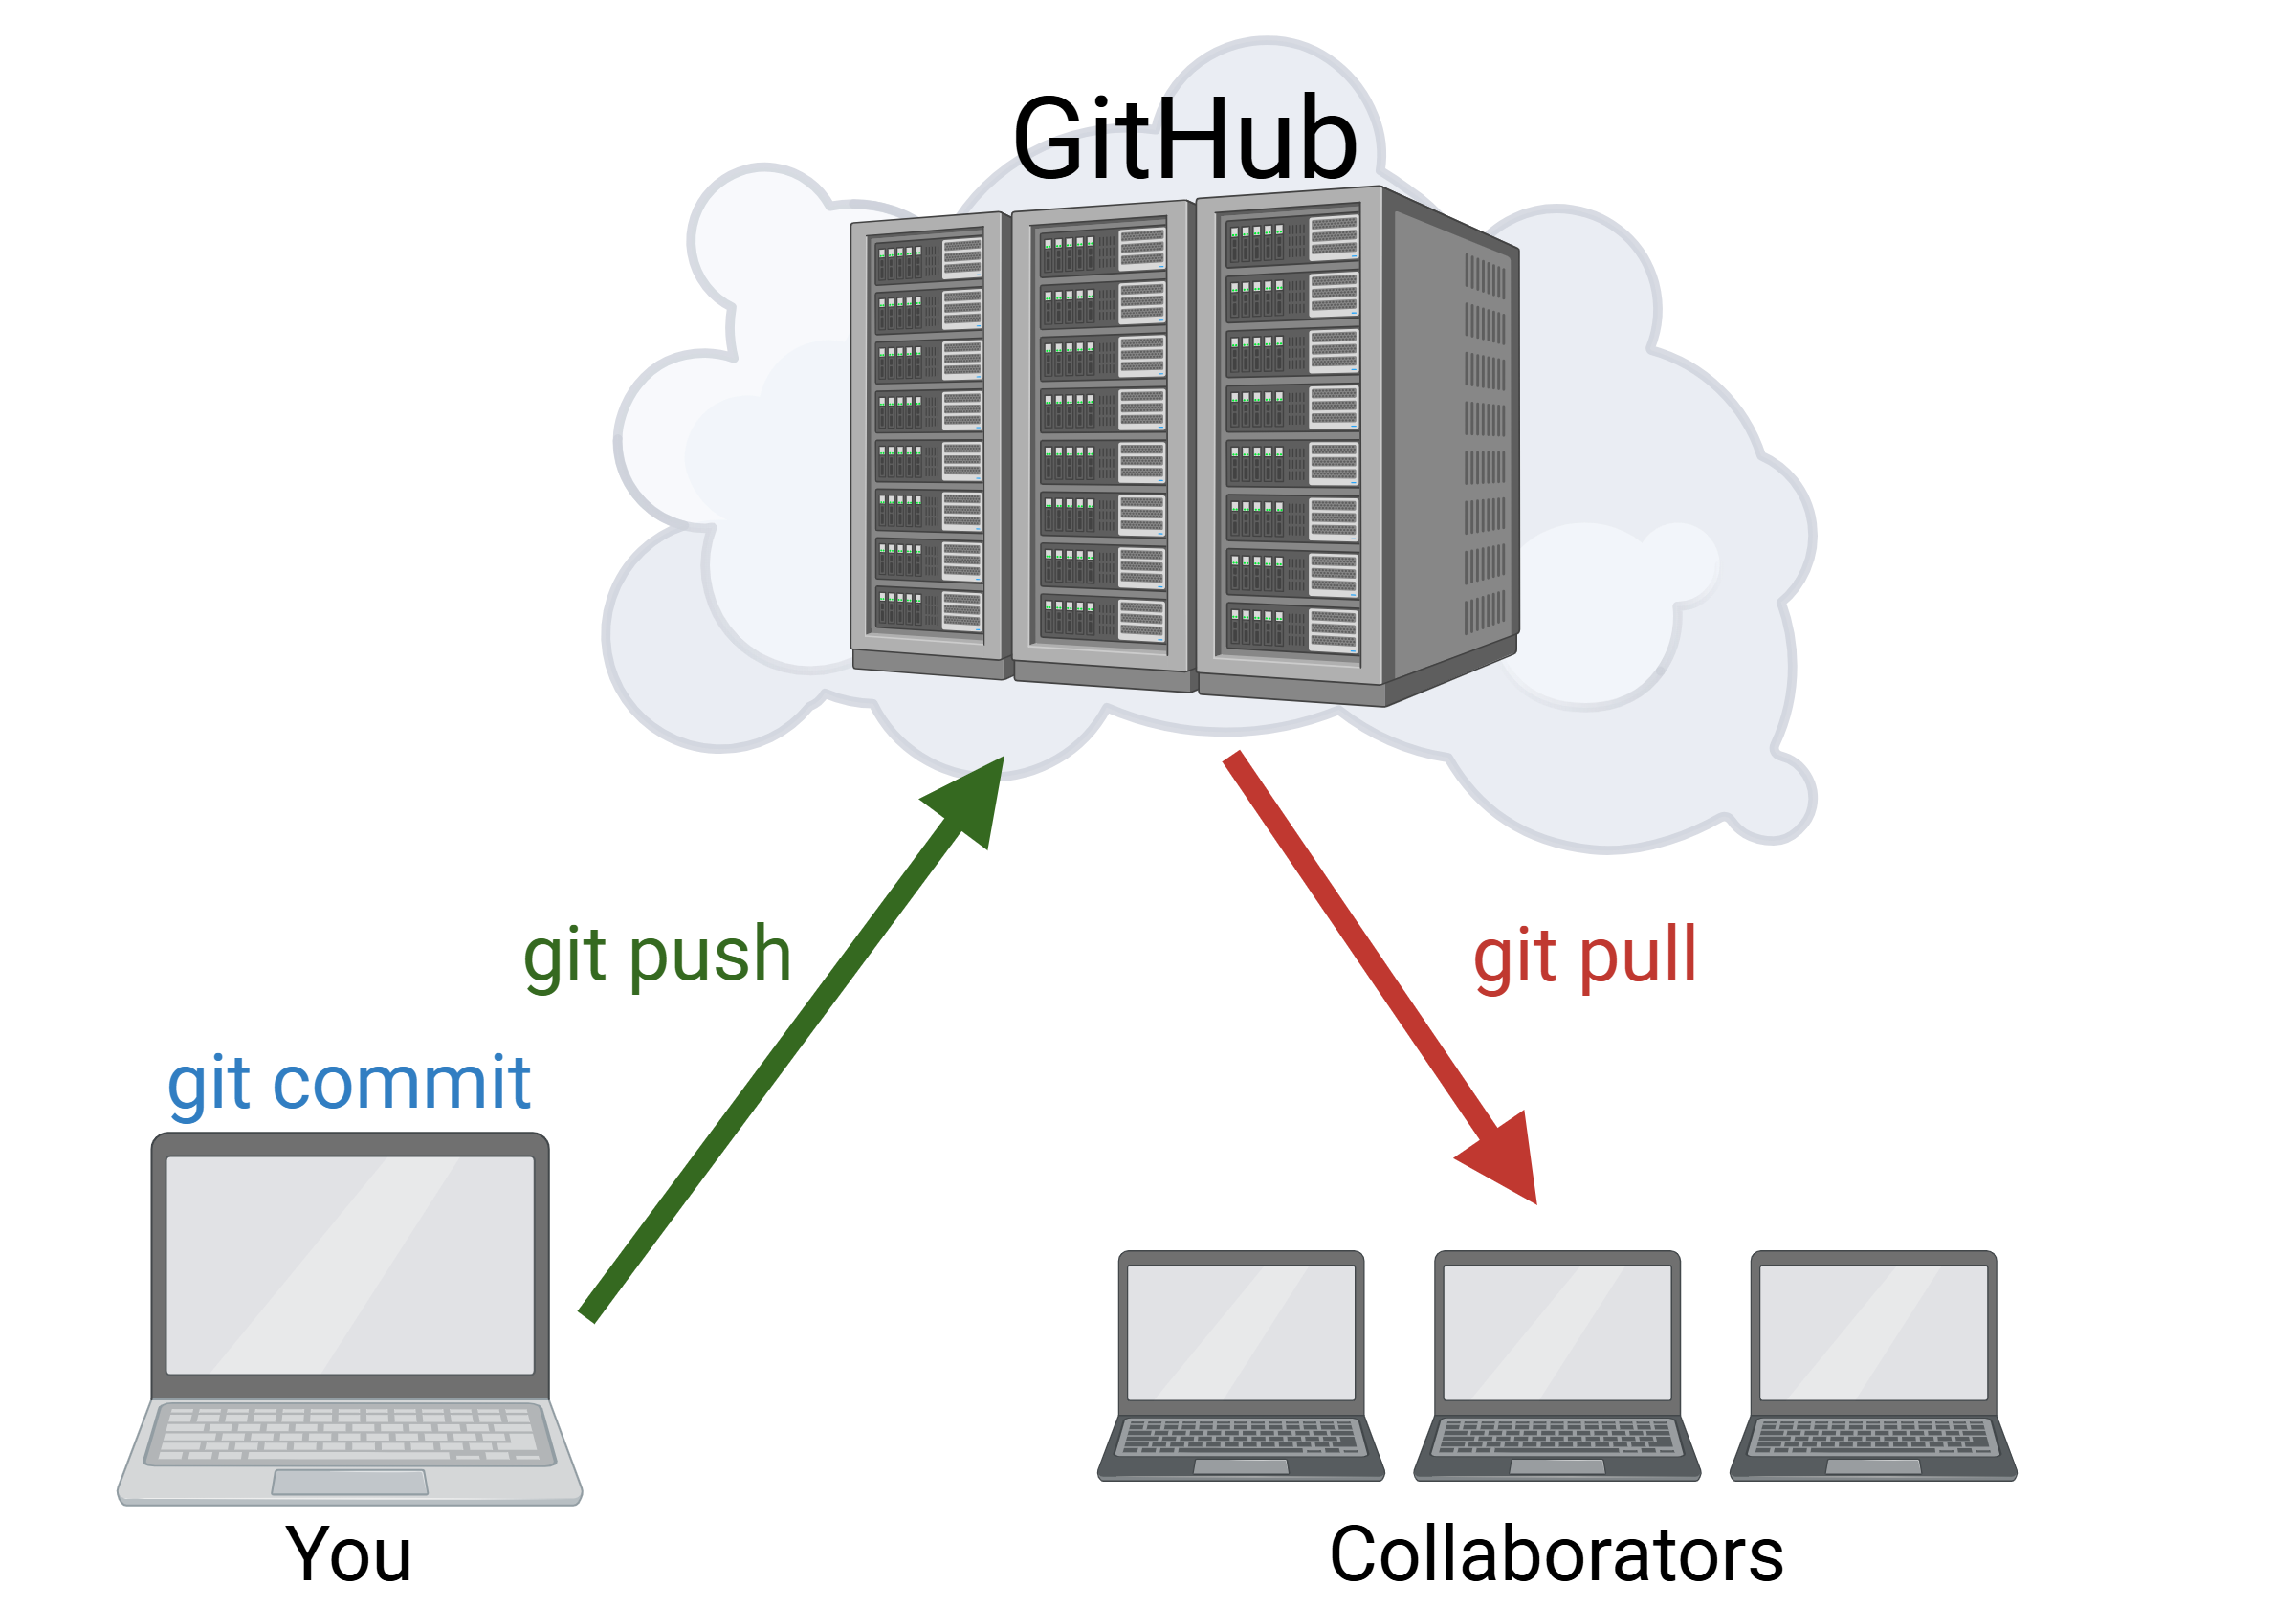
The rest of the git menu might look a bit complicated, but there are just three main buttons at the top of the Git tab that you should know: Pull, Commit and Push. To understand what these mean, let’s first think about how we will typically work with an online repository.
Right now, you have a project folder on your computer that is a copy of the repository you made on GitHub. In git lingo, we say that these are the same version. If you start making changes on your computer, your version of the repository will change on your computer, but not in your repository on GitHub. There are some good reasons not to have things synchronized. First, you may want to work somewhere without stable internet access. Second, you might want to try out different things on your computer, but then clean them up before you release them back to your collaborators or to the public at large. You may also have several people working on the same files, in which case you may want to review all the changes and decide which changes will be rolled back into the official version on GitHub.
Git Commands
The Pull, Commit and Push commands are used to manage the different versions that can exist on different computers.
Pull – use this to pull the latest files and commits from GitHub. It’s generally good practice to pull changes every time you work on a project, to make sure you are working with the latest version.
Commit – use this to commit the changes you make. Commits are like pressing ‘save’ on your computer, except that each commit gets a unique code, which makes it possible for you to roll back to previous commits.
Push – use this to push your commits to GitHub. It’s generally a good idea to do this when you are done working on the project for a while. This will allow your collaborators to pull your changes from GitHub before they start working on their piece.
Now, try making changes to your README.md file. For example, you might apply what you learned in the R Markdown chapter to add a header:
# My First RepoNow watch the Git tab and save the changes on your computer. You should see the README.md appear in the window, telling you that changes have been made to the file on your computer. Note that this didn’t appear until after you saved the changes.
These changes are saved on your computer, but not on GitHub. To change the GitHub version to match this version, we need to first Commit to confirm that we want to document these changes, then Push to upload the changes to GitHub.
Commit
To commit changes, click on the check box under the Staged column for the files you want to commit. In this case, there is just one. Then, click the Commit button in the menu bar of the Git window.
A new window will pop up to show you the changes you have made. Additions are highlighted in green and deletions are highlighted in red. You also have to add a short note in the text box under Commit message to explain what changes were made. This can be anything and it doesn’t have to be long, but it will help you keep track of the different versions of your code.
After reviewing the changes and adding a commit message, click the Commit button. You might choose to do this separately for different files, so that each one can have its own commit message. Finally, click the Push button to upload the changes to GitHub.
Note: It can take a few minutes for the GitHub website to update these changes. You also might have to refresh your browser to see the changes.
Branches
You can think of a git repository as a sort of timeline, with each commit saved as a separate point along the timeline, or branch. You can see these past versions in R Studio with the History button in the Git tab.
If you find that you’ve made a fatal mistake, you can revert back to a previous version along the branch.
If two or more people work on the same files, they create different branches that each have an origin and an endpoint. Changes in these branches can be merged back to the main (or sometimes master) branch.
Each version has its own unique ID code, called a Secure Hash Algorithm (SHA) code. This can be helpful with reproducibility since your main branch can change, but each commit is unique. You can see SHA, commit notes, and the version author for each commit in the History window.
Timeline
After you become more familiar with git in R Studio and start making lots of commits that you push to GitHub, try clicking on the clock icon in RStudio or in your GitHub repository. This will show you a timeline of your official commits. Each one has an SHA, which is a Secure Hash Algorithm created by git to track your changes. It sounds fancy, but it’s just a unique ID code that specifies every commit in your repository.
And that’s really all you need to know to get started. Like everything else in this book, it can take a bit of practice and a lot of mistakes to get a good understanding of git and GitHub. However, I’ve found it to be an invaluable tool and I use it regularly to collaborate with my students to write theses and peer-reviewed manuscripts. I’ve also used it to build my ‘lab resources’ website (https://ColauttiLab.GitHub.io/Manifesto/index.html) and this book!